Create Your First Mock
This tutorial shows you how to create a workspace and a mock, and test that mock.
Prerequisites
- Sign in and log in to SmartMock.io
- (Optional) Install curl tool development machine
Create a workspace
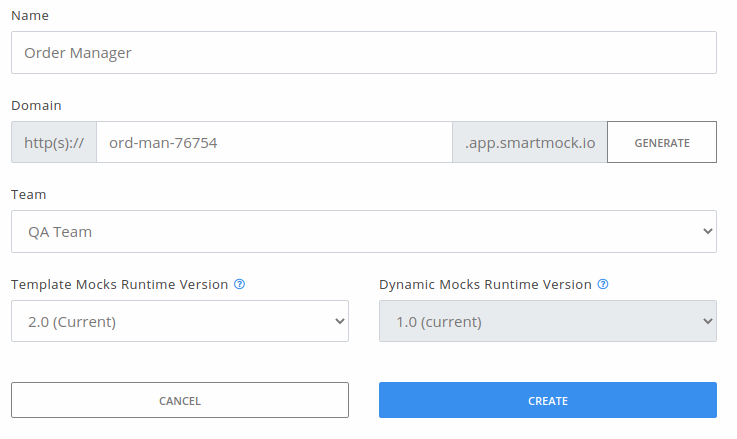
Before creating a mock, you need a workspace. A workspace has a unique subdomain assigned and is a container for mocks. Go to the Dashboard section and click Create/Import -> New Blank Workspace.
- In the Name field, enter the descriptive name of a workspace, for instance, Order Manager.
- In the Domain field, enter the name of the subdomain you'll use to access your workspace. Please note that the subdomain may contain letters, digits, and hyphens. You may also generate a new random name. Your workspace's subdomain must be globally unique.
- In the Team field, select a team. Every workspace created must belong to only one team.
- In the Template Mocks Runtime Version and Dynamic Mocks Runtime Version fields, select the values marked as current.
- Click Create.
Create a New Mock
- Click the workspace created in the previous step (Dashboard section).
- Click Create Mock.
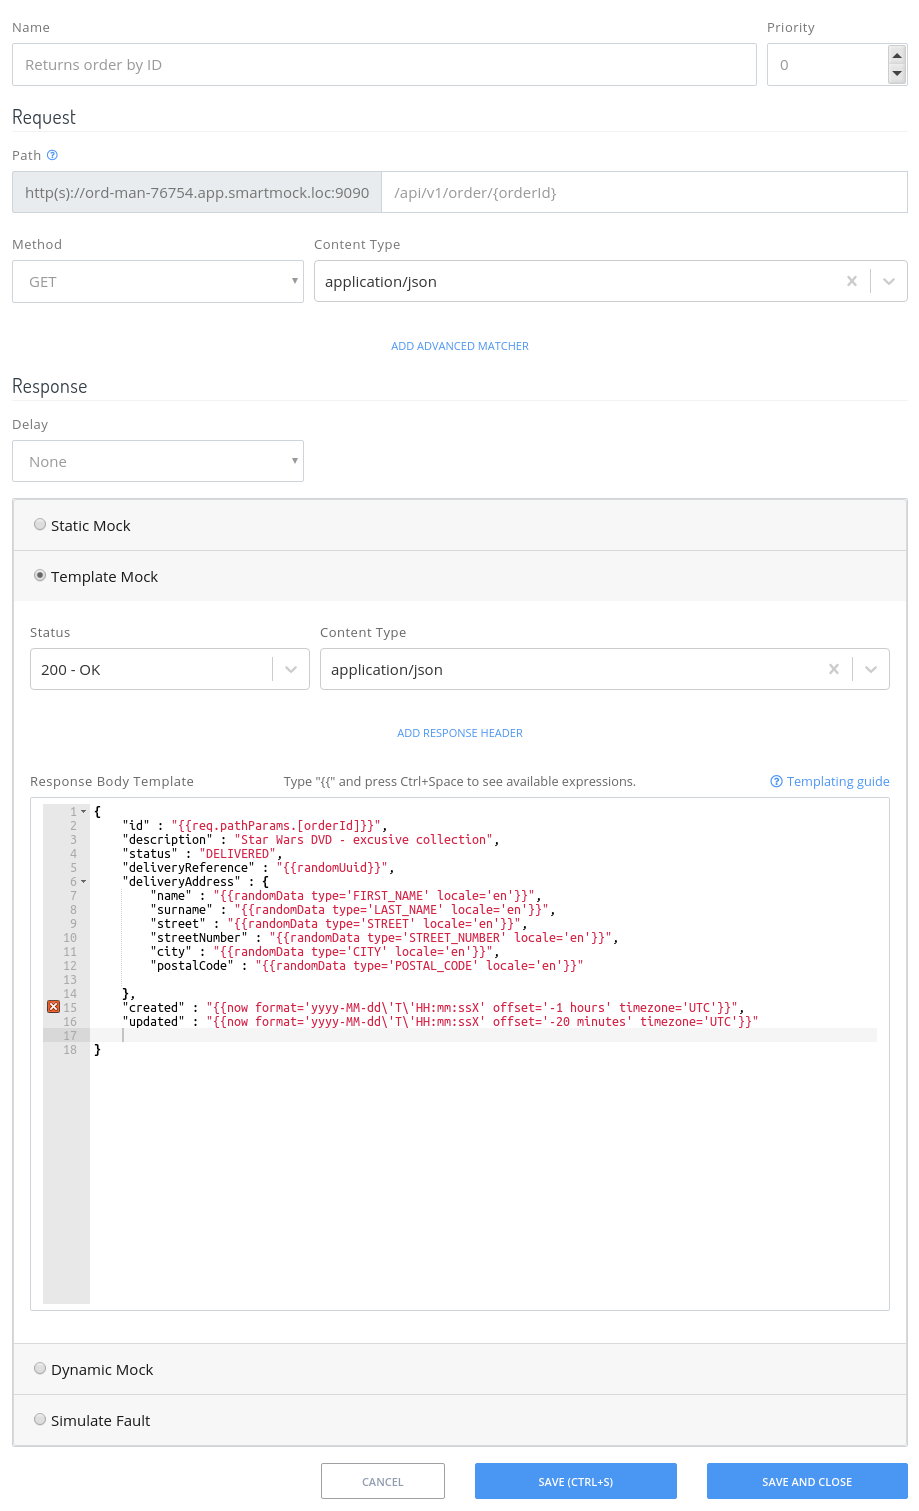
- Enter a descriptive name for the mock. For instance, Returns order by ID.
- In the Path field put
/api/v1/order/{orderId}. - Leave HTTP method set to
GET. - In the Content Type field select
application/json. - Select Template Mock (more details).
- Leave the Status field value as
200 - OK. - In the Content Type field put
application/json - Set the following code in the Response Body Template field:
{
    "id" : "{{req.pathParams.[orderId]}}",
    "description" : "Star Wars DVD - exclusive collection",
    "status" : "DELIVERED",
    "deliveryReference" : "{{randomUuid}}",
    "deliveryAddress" : {
        "name" : "{{faker 'name.firstName'}}",
        "surname" : "{{faker 'name.lastName'}}",
        "street" : "{{faker 'address.streetName'}}",
        "streetNumber" : "{{randomNumber min=10 max=100}}",
        "city" : "{{faker 'address.city'}}",
        "zipCode" : "{{faker 'address.zipCode'}}"
    },
    "created" : "{{now format='YYYY-MM-DD[T]HH:mm:ss[Z]' offset='-1 hours' timezone='UTC'}}",
    "updated" : "{{now format='YYYY-MM-DD[T]HH:mm:ss[Z]' offset='-20 minutes' timezone='UTC'}}"
}
- Click Save. You'll be redirected back to the Workspace Details view.
After the mock is saved, it's immediately available for service consumers.
Test the Mock
- In the New Mock view, click the Test request button.
- Put
/api/v1/order/1234into the URL field. - Enter
application/jsonin Content Type field. - Click Send.
You should see the output of the test (request, response, rendering logs).
Test the Mock (curl)
It's also possible to test the mock from your development machine using the curl tool.
curl -H "Content-Type: application/json" https://ord-man-76754.app.smartmock.io/api/v1/order/5421356
You will see a similar output:
{
    "id" : "1234",
    "description" : "Star Wars DVD - exclusive collection",
    "status" : "DELIVERED",
    "deliveryReference" : "6a3d23da-f8ed-49e4-9d05-5d02336bdf08",
    "deliveryAddress" : {
        "name" : "Elwin",
        "surname" : "Kuphal",
        "street" : "Sienna Valley",
        "streetNumber" : "39",
        "city" : "Lake Judsonton",
        "zipCode" : "14636"
    },
    "created" : "2018-10-08T04:29:46Z",
    "updated" : "2018-10-08T05:09:46Z"
}
What Next?
Now you are ready to create your own business-specific mocks. Check out our documentation for Static Mocks, Template Mocks and Dynamic Mocks, and decide which one is the most suitable for your use case.
You may also contact our support team if you have any questions or suggestions.


